1966 Ford F100 EFI Conversion

Here's a project we did a long while back. We hadn't seen one of these conversions, so I thought I'd try it. This project was completed in 2003 and is currently being enjoyed by it's owner in the Monterey CA area. Every once in a great while, we take on a non-Bronco project, or a project that is on a car that doesn't belong to or live with the greater staff of BajaBronco.com. Well, this time we did both. The owner of this 1966 Ford F100 shortbed wants it to be a fun hauler for a later model Mustang they race. Here's the basic idea: Ford Lightning Pickup circa 1966. Well, not quite that crazy but you get the picture: 5.8 EFI, 4 wheel disc brakes, power steering, AOD trans, power brakes. See below for details on some of the stumbling blocks as well as neat fixes, etc. If you are building a similar rig and have any questions = Email Andrew
When Greg, the owner, picked this truck up it was pretty clean. Basicly a 1966 F100 Custom Cab shortbed truck with the extra gauges in the instrument panel and the toolbox built into the lower bed. Someone put a cheaper white paintjob on it and did the interior in grey late-model fuzz. The motor, trans and the rest of the truck was basicly stock. It originally had a 352 V8 engine and 3 speed automatic trans. Original color was beige. The only rust I've found is in the floors where someone patched it up with a roadsign. The same innovative genius used speaker wire and a pushbutton switch for the starter, glue everywhere in the interior and probably cried when his Dixie Chicks CD got stuck in the CD player.


I began by removing the 390 or 352 that was in it. I also removed all the factory wiring and anything bolted to the inner fenders and firewall. The first order of business was to get the motor in and mounted. Here you can see I cleaned and painted the frame so I could see what I was doing.
The motor we sourced was a '96 F150 5.8 EFI motor. We were just looking for a solid longblock to use. I found one locally with 30k miles on it and took it home to prep. I removed all fuel injection parts and discarded them as we were going to use Mustang parts for that. Most of the bracketry for the serpentine system was retained.


A new water pump, timing chain, and gaskets were used on the motor. We retained the oil pan and simply cleaned and painted the motor. New valve springs and E303 Ford Racing cam were used. Later after completion of the truck, I installed a Comp Cams unit for better towing torque. Always a learning curve.
The Trickflow intake we selected was one of the few ont he market at the time. It was designed to use with either Mustang heads or Trickflow's Twisted Wedge heads. So you can see here that the lip on the factory truck heads didn't allow for us to drop it in. We barely clearanced the intake to make it fit. So far, 25k miles and no intake gasket blowout to report. I have NOT encountered this problem with any builds since... so unless you are doing this exact motor and intake, I wouldn't stress this part.


With the motor ready to drop in, I concentrated on the disc brake system. At the time I think we orderd all brakes from Master Power brakes. We got stock F100 front spindles rebuilt and ready to Kingpin -in. That was fairly easy. Though, my advice is stay away fromt he nylon kingpin kits. They wearout fast. If you haven't done kingpins and have the money - take them to a shop that specializes in them, like Freeman Frame in San Jose, CA. This rear brake kit came from Master Power but was manufactured by someone else. It uses Cadillac calipers and they are tricky to get working right. Make sure your caliper is clocked so that the bleeder is straight up. You'll never get pressure if not. Also be sure and adjust your ebrake levers and cables or you'll also run into problems. By now, I'm sure theres a better kit out there for rear disc on a truck 9".
By now the truck sat empty of drivetrain with all 4 wheels set up with disc.


At this point I cleaned the work area and regrouped for motor fitment and EFI wiring hookup.
Finding a spot for the computer harness was a task. As you can see I found a spot right by the heater hoses, but far enough away so they didn't interefere. I used a holes saw twice and cut between them to make the oval hole for the Ford plug. Wiring harness was a Ron Morris harness custom make for the truck using MUSTANG fuel injection set up from TPS to O2s.


There's what the factory plug looks, fitted in place.
Still not enough room was there for the heater inlet. So, I looked around and found a Bronco parts place making a plate to convert the old heater inlet from square to round. This helped me get enough room to route the harness. I think I got that piece from Wild Horses or Tom's Bronco Parts.

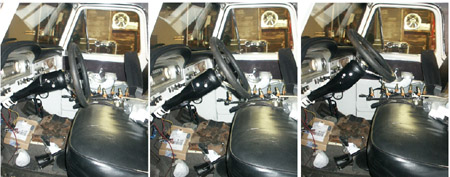
The owner wanted a tilt column with no shifter on it, so I ordered an aftermarket column with Chevy based turn switch with a custom length. I just measured for how much space was there and where we wanted the steering wheel. Make sure you know what steering wheel you are going to use...it helps to know ahead of time. Steering box is stock 74 F100 power box. It bolts right to the frame, but you may need to clearance on the top channel of the framerail just a bit. Be sure and get the pitman arm from the donor truck too. Order new tie rods as well because you'll find out the 65-66 stuff is a little shorter and sometimes the ball joint studs dont reach far enough into the new disc spindles.
Here's the column in action.
We used 69 F100 motor mounts on the stock 390 engine pedestals. Worked pretty well. For the trans, I used an AOD rebuilt with better clutches, etc. The cross member ended up in the right place and the stock trans mount holes also lined up. The angle was just a little low, so I spaced it up with a couple of nuts and some longer bolts. It's not billet or chrome, but it's gotten the owner home (for the past 7 years).
That's a stock mustang 87-93 throttle cable going thru the stock location. On the interior end, you'll need to bend your pedal 90 degrees where it attaches, normally with a link rod. grind off that little ball that normally attaches to the link rod, so that you have just a hole in the end of the pedal. This hole is the same size as the Mustang cable bushing on the interior end of the cable. Simply slice into the hole and slide the cable thru, securing the bushing. Connect the other end to the throttle body. You may need to bend your pedal further to give adequate WOT.

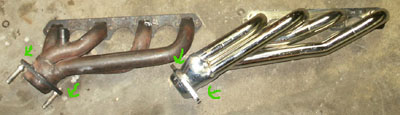
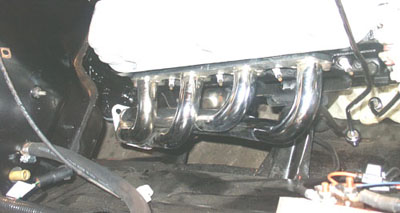
We tried using the Mustang headers, but with the added height of the 351W, they interfered with the frame. Get a set of JBA shortys from Wild Horses 4x4 if you are running a 351W. Or use older Ford truck cast iron units. Mustang 5.0....Mustang headers may work..but I can't say for sure.
Note the fitment of the JBAs. nice. Matter of fact, these would fit on the 5.0 just fine.